

Whenever starting a new project as a .NET developer, I am often confronted with the onerous task of pulling in all my standard set-ups from previous projects into the Visual Studio solution. These tasks are always the same, no matter which type of project it will be, from basic web.config settings to SEO settings and handling 404s to simple project and folder architecture.
One way to handle this situation is to build a template or boilerplate that you can use to start all your projects and get that hard work done in a few minutes. Previously it was common to create Visual Studio project templates (VSIX), but these were annoying to make, maintain, and update. More recently, a tool called Yeoman Generator can create new Visual Studio projects from the command line. The outcome here is simple and effective, but to build custom templates you may have to learn a whole new javascript syntax.
With .NET Core, the most recent, open source version of .NET, Microsoft introduced a command line tool that includes the command ‘dotnet new’ to create new Visual Studio projects from the command line. As opposed to Yeoman Generator, it’s part of .NET. And it is incredibly simple to make, maintain, and update templates, which don’t necessarily have to be in .NET Core. Even better: we can use this .NET Core tool today while the content management systems we use (Sitecore, Episerver, etc.) continue to update their products to work with .NET Core.
Basics
To get started, Microsoft has a great guide to using dotnet new. Now, I’ll walk you through an example of how to make a custom template based on two simple needs:
- Be able to create a full solution with multiple projects from a single command
- Name the solution appropriately right from the command line
Create Solution
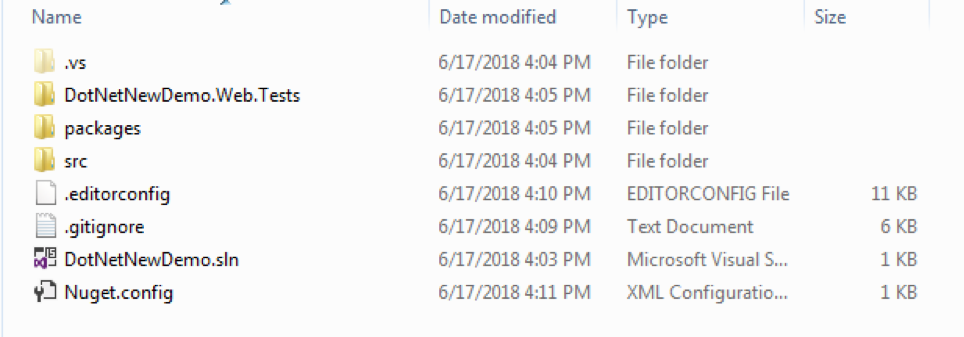
The first step is to create a solution. My solution is a .NET Framework 4.6.1 Solution with an MVC Web project and a Unit Test project. I have added some NuGet.config, an .editorconfig and a .gitignore file.

Add Template.config
Add a folder to the root of the project named .template.config. Inside the .template.config folder, create a template.json file to configure your template. This template.json is where my work is mostly going to take place.
First I will create some basic information about the template:
{
	"$schema": "http://json.schemastore.org/template",
	"author": "Ethan Schofer",
	"classifications": [ "DotNetNewDemo", "Boilerplate" ],
	"identity": "DotNetNewDemo",
	"name": "Dotnet New Demo",
	"shortName": "dotnetnewdemo",
	"tags": {
		"language": "C#",
		"type":"solution"
	},
	"preferNameDirectory":true
}
While I am developing, I can install the template at the command line, right from the file system:
C:\> dotnet new -i C:\Projects\DotNetNewDemo
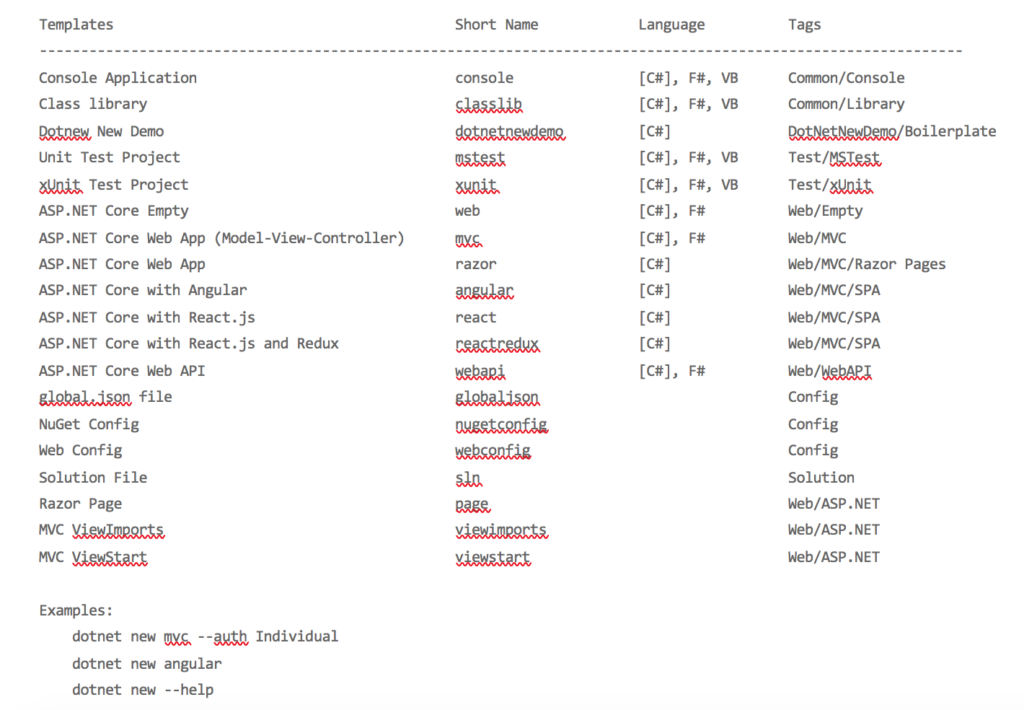
This will list all the installed templates, including my recently installed template:
I can uninstall it similarly:
C:\> dotnet new -u C:\Projects\DotNetNewDemo
Then I will add some basic renaming, in order for things to be name appropriately in the newly created project based on this template. I do this using “symbols” in the template.json. The symbol entry handles this, and I will eventually have many symbol entries for the template. So, I will add:
"symbols": {
	"projectname": {
	    "type": "parameter",
	    "dataType": "string",
	    "fileRename": "DotNetNewDemo"
	}
}
To my template.json. This will rename any files that are named DotNetNewDemo with whatever I give to this parameter. After installing, if I call help on my template:
C:\> dotnet new dotnetnewdemo -h
I will see a description of my symbol, along with a description of how to call it:
Hero Episerver CMS Boilerplate (C#)
Author: Hero Digital
Options:
  -p|--projectnames
		    string - Optional
I can also add a parameter to replace the appearance of the project name in files, such as namespaces and references by adding the parameter ‘replaces’. I’ll add it several ways to handle case sensitivity:
"symbols": {
    "projectname": {
	"type": "parameter",
	"dataType": "string",
	"fileRename": "DotNetNewDemo",
	"replaces": "DotNetNewDemo",
	"replaces": "dotnetnewdemo"
      }
}
I also need to exclude some things from my solution because they are specific to certain installs and/or file locations, particularly the packages folder (the dotnet new templating engine really didn’t like these!) and .vs folder that Visual Studio creates. That folder has machine specific settings. I do this by adding a sources section, where I can list excludes.
"sources": [
    {
      "modifiers": [
	{
	  "exclude": ["packages/**",".vs/**"]
	}
      ]
   }
]
Notice that the sources, modifiers and exclude sections are all arrays. I might need to add additional files or folders here depending on the type of CMS this template is for. For example, for an Episerver template my excludes look like this:
"sources": [
    {
      "modifiers": [
         {
           "exclude": ["packages/**",".vs/**", "src/DotNetNewDemo.EpiserverCMS/App_Data/thumb_cache/**","src/DotNetNewDemo.EpiserverCMS/App_Data/*.mdf","src/DotNetNewDemo.EpiserverCMS/App_Data/*.ldf","src/DotNetNewDemo.EpiserverCMS/App_Data/*.log"]
         }
      ]
    }
]
Now my entire template.json file looks like this:
{
   "$schema": "http://json.schemastore.org/template",
  "author": "Ethan Schofer",
  "classifications": [ "DotNetNewDemo", "Boilerplate" ],
  "identity": "DotNetNewDemo",
  "name": "Dotnet New Demo",
  "shortName": "dotnetnewdemo",
  "tags": {
    "language": "C#",
    "type":"solution"
},
  "version":"1.0.0.0",
  "preferNameDirectory":true,
  "symbols": {
    "projectname": {
        "type": "parameter",
        "dataType": "string",
        "fileRename": "DotNetNewDemo",
        "replaces": "DotNetNewDemo",
        "replaces": "dotnetnewdemo"
     }
},
 "sources": [
  {
    "modifiers": [
      {
        "exclude": ["packages/**",".vs/**", "src/DotNetNewDemo.EpiserverCMS/App_Data/thumb_cache/**","src/DotNetNewDemo.EpiserverCMS/App_Data/*.mdf","src/DotNetNewDemo.EpiserverCMS/App_Data/*.ldf","src/DotNetNewDemo.EpiserverCMS/App_Data/*.log"]
      }
    ]
  }
 ]
}
Now I can install my template:
C:\> dotnet new -i C:\Projects\DotNetNewDemo
Then change directory to where I want my project created, and create the project:
C:\> dotnet new dotnetnewdemo -p MyProjectName
And my new project is created with the name MyProjectName. Namespaces, inner project names, etc. are named appropriately. And if I set up my initial template correctly, my new project just needs a NuGet restore and should be ready to go. You may need to try out your template a few times to get it to your ideal starting point for a new project.
I then check my template into source control, and now other members of the team can check it out and install it on their machines. Because the template is really just a Visual Studio solution, you can easily update it, check the updates into source control, and then reinstall the template on your machine for future projects – no need for VSIX compilation/installation.
You can add optional parameters to include or exclude pieces of your template. Plus, you can package up your template as a NuGet package and distribute it to other members of your team. There are lots of publicly available templates for dotnet new as well.
Happy templating!
––
Learn more about .NET and Sitecore development with our guides to improving Sitecore’s startup time, implementing Sitecore EXM with external data sources, and integrating Sitecore and Salesforce Marketing Cloud.